Opening hours are one of the core settings in your reservation system. Just like dining rooms and tables, they must be properly configured before you can start accepting reservations.
Opening hours determine:
-
When online reservations are available through the booking widget.
-
When staff can enter phone reservations.
-
How availability differs by dining area or room.
This guide will walk you through everything you need to know about setting up and customizing your opening hours.
Prepare Your Dining Areas
We recommend creating your dining areas or zones before setting opening hours.
This way, you can control availability by room, avoid repeating setup, and keep everything consistent.
Open the Opening Hours Settings
-
Go to Settings → Opening Hours.
-
At the top of the page, choose whether you want availability to show in 15-minute or 30-minute slots.
-
15 minutes: Shows more time slots. Best for flexibility, as you can still restrict which slots appear online.
-
30 minutes: Shows fewer time slots. Easier to manage if you don’t need fine adjustments.
Tip: Even if you allow all slots for phone reservations, you can still customize which ones are visible for online bookings.

Set Weekday Opening Hours
Each weekday is listed separately. For each day:
-
Closed days → Select Close at the top right corner of the day.
-
Open days → Enter your start time and end time.
-
Important: The end time should be your restaurant’s actual closing time, not the last reservation time.
-
The system automatically calculates the last available reservation based on your reservation duration settings. Example: If duration = 2 hours, closing time = 23:00 → Last available reservation will be at 21:00.
-
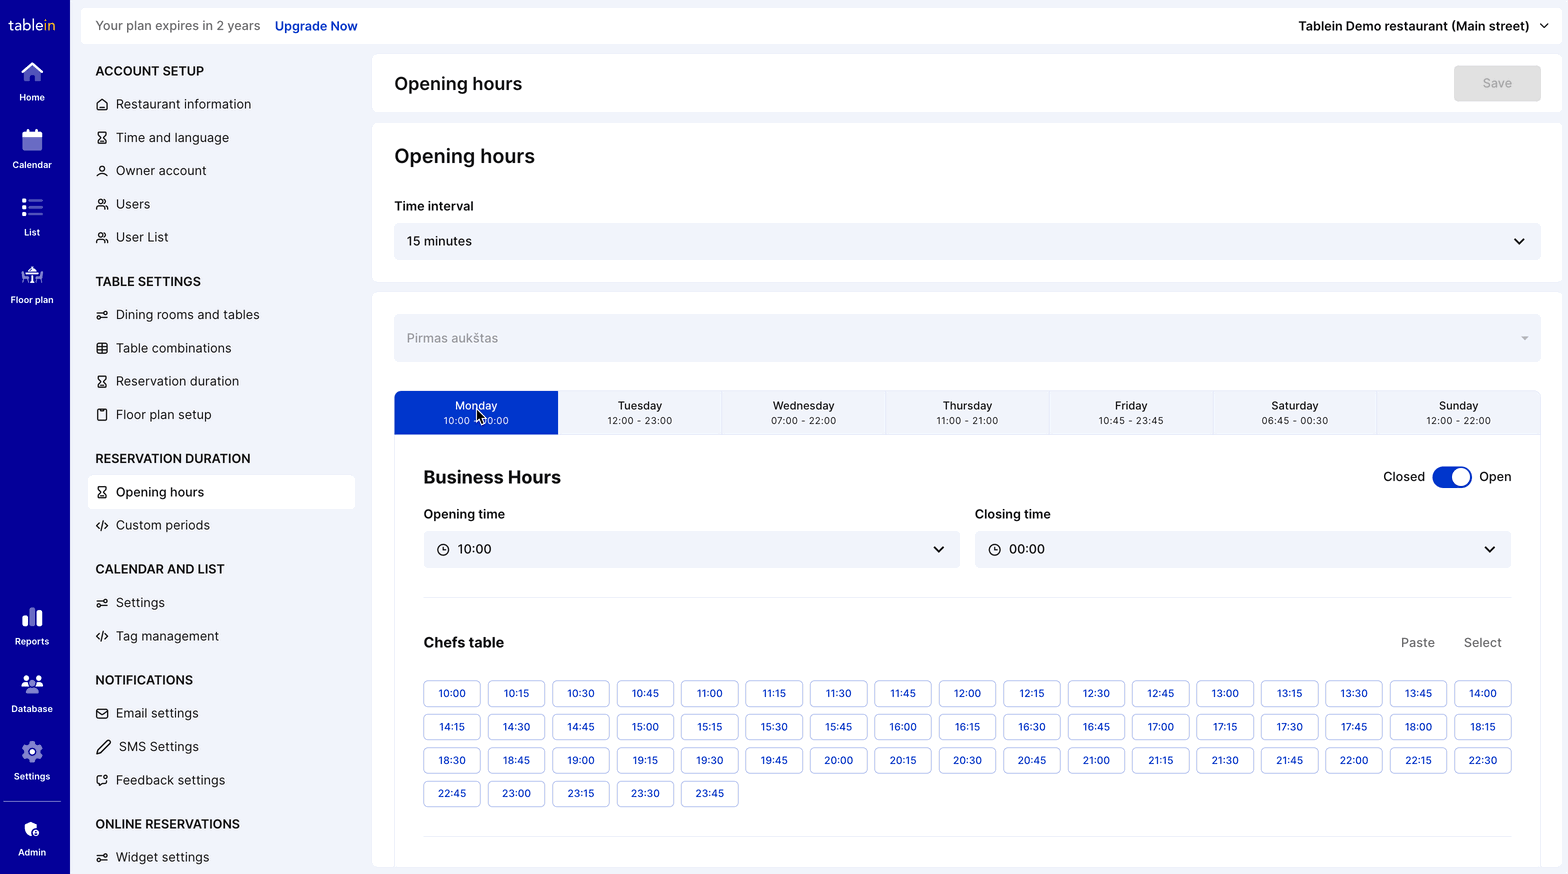
Block Break Times
If you don’t want to accept reservations between services (e.g., lunch and dinner):
-
Select the time slots to block them.
-
Blocked slots will turn grey (inactive) in the calendar and booking widget.
To repeat this for other dining areas, use the Copy and Paste function.
%202025-09-08%20at%204-41-04%20PM-png.png?width=3150&height=1750&name=Tablein%20Demo%20restaurant%20(Main%20street)%202025-09-08%20at%204-41-04%20PM-png.png)
Manage Dining Room-Specific Rules
-
If a specific dining room should not allow online reservations, use the Select All button and block all times in that room.
-
This keeps the room available internally but ensures guests cannot book it online.
%202025-09-08%20at%204-41-31%20PM-png.png?width=3126&height=1740&name=Tablein%20Demo%20restaurant%20(Main%20street)%202025-09-08%20at%204-41-31%20PM-png.png)
Repeat for All Weekdays
-
Continue setting hours for each weekday.
-
Apply different opening and break times as needed.
-
Use Copy and Paste to save time when multiple rooms share the same schedule.
Save Changes
-
Once everything is configured, click Save.
-
Any unsaved changes will be highlighted with a red indicator as a reminder.
Next Steps: After saving, check your booking widget to confirm that times display correctly for guests.