Important Notice:
The new table editing function is not compatible with the old widget. The new table grouping/combination feature is not compatible with the old plugin. If you wish to update the plugin on your website, please integrate widget from V3 version widget integration.
Log in to the system at admin.tablein.com and go to the "Dining Rooms and Tables" settings.
In this section, you will see all dining rooms and the tables within them. Here you can:
-
Change the name of the dining room
-
Upload an image
-
Add a description in the selected language
-
Edit table capacity
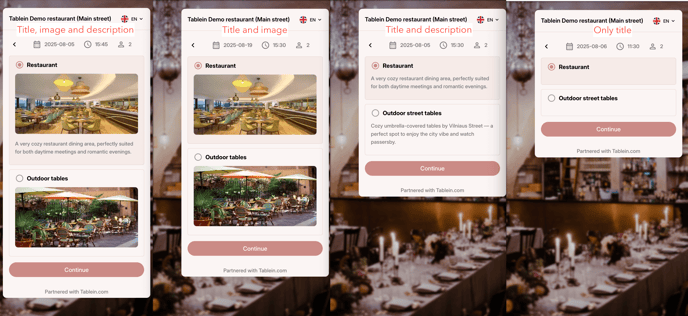
In the widget, dining room display options can be configured as follows:
- Title, description, and image
-
Title and image
-
Title and description
-
Only title
-
Hide dining room selection from guests
To hide this option, go to the Widget settings and disable "Allow guest to choose dining room"
Add Dining Area Photos and Description
-
Go to Room & Table Settings
-
Click Edit next to the room name
-
Upload a photo (max 5 MB) – displayed at 400×200px
-
Choose the language and enter a short description (up to 150 characters)
-
Click Save
%202025-06-02%20at%2012-58-52%20PM-png.png?width=2282&height=1400&name=Tablein%20Demo%20restaurant%20(Main%20street)%202025-06-02%20at%2012-58-52%20PM-png.png)
How to Add a New Dining Room
-
Click Add Dining Room at the top right of the page.
-
Enter the name of the dining room.
-
(Optional) Upload a photo and add a brief description to highlight the space.
-
Choose whether to allow online reservations for this dining room.
-
Collapse in Calendar – we recommend keeping this disabled for better visibility.
-
Click Save to apply your changes.
Tip: Adding images and descriptions helps guests understand what to expect and can increase bookings.
%202025-06-02%20at%201-00-38%20PM-png.png?width=2312&height=1602&name=Tablein%20Demo%20restaurant%20(Main%20street)%202025-06-02%20at%201-00-38%20PM-png.png)
Add Tables
- Click Add Table at the bottom of the list.
- Enter the table name.
- Enter the number of seats. For example, a table for two can be set from 1 to 2, and a table for four can be set from 3 to 4 or from 2 to 4.
- Choose whether you want to allow online reservations
(note: if the restaurant room does not accept online reservations, the system will not allow it even if set to YES in the settings). - (Optional) Choose the table shape. Once a new table layout is added, you won’t need to select the shape again. Note: You can now move tables from one room to another.
- You can move table between dining rooms if you decided to add more areas
- If your tables can be merged for larger parties, please set up Table combinations.
%202025-06-02%20at%201-04-12%20PM-png.png?width=2306&height=1216&name=Tablein%20Demo%20restaurant%20(Main%20street)%202025-06-02%20at%201-04-12%20PM-png.png)
Deleting Tables or Dining areas
The updated system does not allow you to delete a table if there are any upcoming reservations. To delete a table, first, disable online reservations and rename the table, for example, to DELETE. Review upcoming reservations and reassign them to another table.
Archiving a dining room
When you choose to archive a hall, it will no longer be visible in the calendar, filter, or table plan. This is particularly useful for seasonal halls and outdoor tables. When the season returns, simply unarchive the hall to make it visible again.
Minimize in calendar
In the calendar view, this feature reduces the dining room to just its name, requiring you to click on the dining room's name to view its details. It is recommended to use this feature for areas that are not in use during the off-season.
